Apache Iceberg is an open table format designed for huge, petabyte-scale tables. Iceberg brings transactions, record-level updates/deletes to data lakes. The project was originally developed at Netflix to solve long-standing issues with their usage of huge, petabyte-scale tables. It was open-sourced in 2018 as an Apache Incubator project.
Amazon Web Services (AWS) recently announced the public preview of Amazon Athena ACID transactions, a new capability that adds write, delete, update, and time travel operations to Athena’s SQL data manipulation language (DML) using Iceberg tables. Athena ACID transactions are compatible with other services and engines such as Amazon EMR and Apache Spark that support the Iceberg table format.
In this post, we will be using Athena to create an Iceberg table and accessing this table using AWS Glue Apache Iceberg custom connector.
To start using Athena and create the iceberg table, we will first need to create two S3 buckets. One of the bucket will be used for Athena query results and the other bucket will be used for iceberg table location. Let’s go ahead and create buckets using AWS CLI.
aws s3api create-bucket --bucket datacoding-athena-results --region us-east-1 --object-ownership BucketOwnerEnforced
aws s3api create-bucket --bucket datacoding-iceberg-table --region us-east-1 --object-ownership BucketOwnerEnforced
To get started querying Iceberg tables using Athena, perform the following steps.
- In Athena create a workgroup called AmazonAthenaIcebergPreview. You must use this workgroup to run queries against the Iceberg tables that you create. Queries on Iceberg tables performed outside this workgroup may have impaired functionality, or produce unexpected behavior. For information about creating workgroups, see Create a Workgroup and Setting up Workgroups.
- Before you run your first query using Athena, you will need to setup a query result location. Click view settings and follow the instructions to set the query result location if not set already while creating the workgroup using the S3 bucket (datacoding-athena-results) we created.

Now, we can create our database and iceberg table. In its simplest form, following queries will create a database and a table with three columns using two table properties. Athena allows only a predefined list of key-value pairs in the table properties for creating or altering Iceberg tables.
CREATE DATABASE datacoding;

CREATE TABLE datacoding.iceberg_table (
  id int,
  data string,
  category string)
LOCATION 's3://datacoding-iceberg-table/iceberg-folder'
TBLPROPERTIES (
  'table_type'='ICEBERG',
  'format'='parquet'
);

INSERT INTO datacoding.iceberg_table VALUES (1,'a','c1');

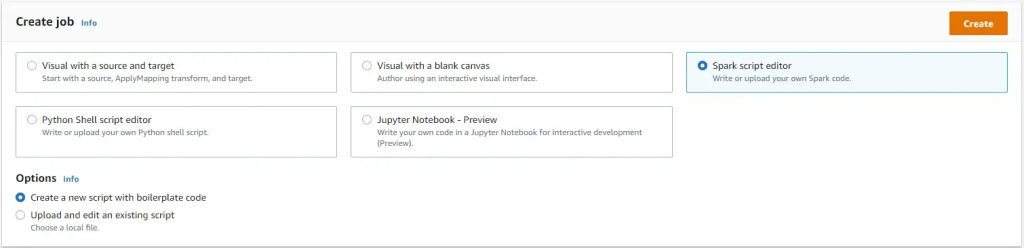
We can now create a new glue spark ETL job using AWS Glue Studio, add and configure the custom iceberg connector and access the table we just created.
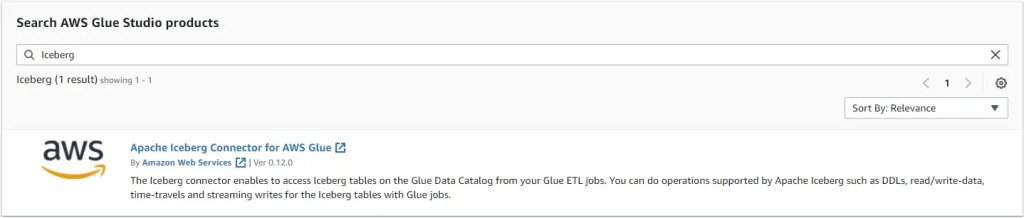
From the AWS Glue Studio Marketplace , search for Iceberg and click the Apache Iceberg Connector for AWS Glue and then click Continue to Subscribe and Accept Terms.
Once the subscription process is complete, click Continue to Configuration to configure the connector and a connection. Choose a fulfillment option and software version and then click Continue to Launch. For this post, I will use the Glue 3.0 connector.

Open the usage instructions and click the Activate the Glue connector from AWS Glue Studio link and create an iceberg connection by setting a name and description for your connection.

Once the connection is created and activated create a new spark job and click Job Details tab to set your Glue version and connection setting. Make sure the glue job version and connector Glue version are set to the same version.
Under job details tab, set connection to iceberg connection you just created. Also create an IAM role for glue job execution if you don’t have one already with appropriate permissions and set the IAM Role in job details tab.

Under Job parameters, add new key --conf and set its value to
spark.sql.extensions=org.apache.iceberg.spark.extensions.IcebergSparkSessionExtension

There are other configurations needs to be added, one option to add all of the configuration in job parameters. You may also define these configurations in the glue job using spark session spark.conf.set. After all the required configurations are set, we can now access to our iceberg table using a simple select query and write number of rows returned from the query in cloudwatch logs using the glue context logger. Final code looks like the following;
import sys
from awsglue.transforms import *
from awsglue.utils import getResolvedOptions
from pyspark.context import SparkContext
from awsglue.context import GlueContext
from awsglue.job import Job

## @params: [JOB_NAME]
args = getResolvedOptions(sys.argv, ['JOB_NAME'])

sc = SparkContext()
glueContext = GlueContext(sc)
spark = glueContext.spark_session
job = Job(glueContext)
job.init(args['JOB_NAME'], args)
logger=glueContext.get_logger()

spark.conf.set("spark.sql.catalog.default", "org.apache.iceberg.spark.SparkCatalog")
spark.conf.set("spark.sql.catalog.default.warehouse", "s3://datacoding-iceberg-table/iceberg-folder/")
spark.conf.set("spark.sql.catalog.default.catalog-impl", "org.apache.iceberg.aws.glue.GlueCatalog")
spark.conf.set("spark.sql.catalog.default.io-impl", "org.apache.iceberg.aws.s3.S3FileIO")
spark.conf.set("spark.sql.catalog.default.lock-impl", "org.apache.iceberg.aws.glue.DynamoLockManager")
spark.conf.set("spark.sql.catalog.default.lock.table", "datacoding_iceberg_lock_table")

df = spark.sql("select id, data, category from default.datacoding.iceberg_table")
logger.info(f"Number of rows in data frame {df.count()}")

job.commit()
Although it is still in preview and some features are limited, I am excited to have this feature in AWS and can’t wait to use it. In this post, I just provided a quick start guide using Iceberg with AWS, but there are many great features of Iceberg and I hope to write another post that covers this more in depth.
Please do let me know in comments if you have used Iceberg for your data lake and your thoughts!

Leave a comment